


Intro
Azure-centered DevOps engineers, know that one of the most useful tools in their arsenal is powershell.
It allows to do all the cool stuff: from interacting with Cloud resources to creating custom scripts and much more. However in terms of automating sophisticated Azure processes, as for example: Performing actions on behalf of service principal by the logic app (without managed identity).
A lot of Powershell cmdlets in order to perform action need to hit the right endpoint with your request. Some create resources when they hit Azure Resource Manager endpoint, while some might get user objects via MS Graph API request. But these requests are locked inside of the cmdlet logic, so when You want to perform a non standard action, You can only operate within the boundaries of the existing cmdlets…. or maybe not :)
I want to show You a rather unique method I use when I learn that the stuff I want to do on Azure via powershell is not yet available and cannot be yet automated.
This method derives from my.. well, rather uncommon interests, that is web application hacking.
One of the main tools Web App pentesters use is PortSwigger Burp Suite.
This tool is a proxy, so if You set it correctly is serves as a medium for network traffic between YOU and the Endpoint You want to connect to.
What does it offer? It captures the webrequests for You to examine!
So if You were wondering how to do some stuff in Azure that You can do in Portal, but for some magical reason there’s no cmdlet for it (or sometimes documentation.. duh!)… You might build your own cmdlet with a little effort. :)
So.. lets prepare our tools!
Prerequisites
As I go further I assume that You are somewhat familiar with Powershell and with creating webrequests through it. (Powershell familiarity is a must, webrequests not necessarily, I’ll show it later)
Now let us install the fun stuff: Burp Suite Community Edition (It’s FREE!)
Go to this URL and get the package for your OS -> Download Burp Suite Community Edition - PortSwigger
Now once your burp suite is installed it’s time to setup 2 things: Browser settings to use Burp as proxy & the certificate to allow burp view the https traffic.
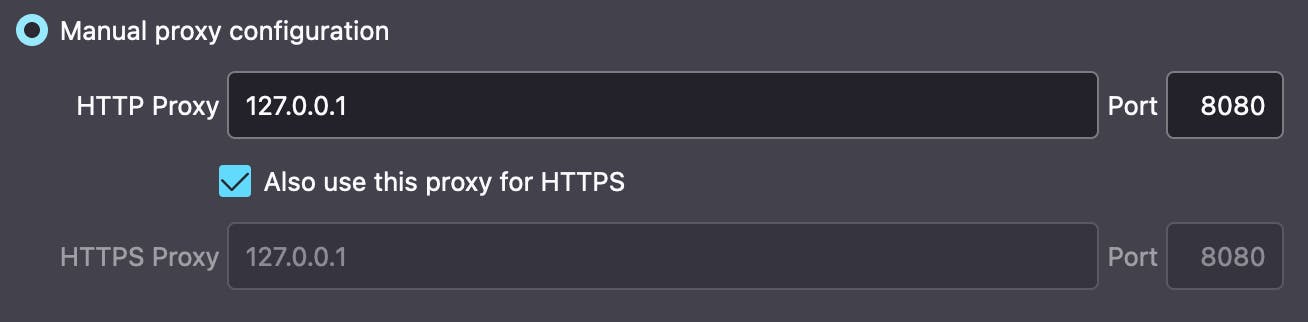
1) Browser proxy settings
In your browser settings go to preferences, then network settings and finally connection settings. There setup your connection as on the screen, as the burp suite will work on your computer on port 8080 (default).
If You’d like to automate this a little, there are various add-ons to browsers, such as FoxyProxy that allows You to change proxy in a matter of 2 clicks instead of browsing through option panels. If You have any issues with setting up check out PortSwigger docs: {portswigger.net/burp/documentation/desktop/..}
Once finished with the setup, You should be able to use browser to reach burpsuite.
The Burp Suite should be turned on..

THIS STEP IS MANDATORY! Without that You won’t be able to install CA certificate. Also mind to turn INTERCEPT to Off in Proxy section of Burp, it might give You a headache as it blocks every request at proxy level for You to examine ;)
2) Burp Suite Certificate Installation
Once You manage to reach burpsuite in the upper right corner there should be a button with CA Certificate written on it. Click it and download the Burp Suite Certificate. Then go to your browser preferences, security & privacy settings and view certificates. Then inside of the certificate manager import the certificate You’ve downloaded a moment ago.
REMEMBER to tick the box -> “Burp Suite can identify web sites”.
NOW WE’RE COOKIN’!
Taking a peak at these juicy web requests
Once You setup Burp Suite in your browser, You’ll gain the insight into what exactly happens under the hood of Azure when You do your tasks. You’ll see your authentication token in the Header (Bearer blablabla).. You’ll see the JSON files with the Azure resources configuration being passed to ARM.. And even requests to MS Qraph when You want to see your own user profile in AAD.
Let’s examine one request for a quick start:
The scenario is that I want to get a specific user from Azure AD. Nothing fancy, but as a MacOS user I have no access to Powershell module of Azure AD, why is that? Because I am not privileged enough:

Info for day 22-02-2022 (Palindrome! YAY!)
But do I have to spin a Windows VM for that or only use Azure Portal? NOPE. Let’s examine the web request I get when I click the demo user “John Compiler” in Azure Portal in AAD:
GET /v1.0/users/{UserGUID} HTTP/1.1
Host: graph.microsoft.com
User-Agent: {my user Agent}
Accept: */*
Accept-Language: en
Accept-Encoding: gzip, deflate
X-Ms-Command-Name: UserManagement%20-%20UserAllPropertiesDataMsGraph
Authorization: Bearer {my token}
X-Ms-Effective-Locale: en.en-us
X-Ms-Client-Request-Id: {Req. Id}
X-Ms-Client-Session-Id: {Sess. Id}
Origin: https://portal.azure.com
Referer: https://portal.azure.com/
Sec-Fetch-Dest: empty
Sec-Fetch-Mode: cors
Sec-Fetch-Site: cross-site
Te: trailers
Connection: close
Examine this request for a moment, as there might be a lot of information. But key-takeaways are:
First line, so:
GET /v1.0/users/{UserGUID} HTTP/1.1
This gives You method so: GET
URI: /v1.0/users/{UserGUID}
Host: graph.microsoft.com
Authorization: “Bearer {my token}”
Then this webrequest came back with a response (I’ve shortened it for readability):
HTTP/1.1 200 OK
Content-Type: application/json
(...)

{"@odata.context":"https://graph.microsoft.com/v1.0/$metadata#users/$entity","businessPhones":[],"displayName":"John Compiler","givenName":null,"jobTitle":"Insider Guy","mail":null,"mobilePhone":null,"officeLocation":MinistryOfMagic,"preferredLanguage":null,"surname":null,"userPrincipalName":"JohnCompiler@mom.com","id":"{UserGUID}"}
So how this works in general? When the request: graph.microsoft.com/v1.0/users{UserGUID} passes through to the graph.microsoft.com and the bearer token is valid You’ll get a response with the stuff You asked for.
But here’s a little catch.. If I want to get THIS specific user I must know his GUID from the start.. how am I supposed to know that???
So a little pivot in design needs to be done: Firstly I need to list ALL the users to later filter out this particular one I am interested in.
So: Get-AllAzureAdUsers | where $_.displayName -eq “John Compiler” more or less :)
I go back to azure portal and record another request with Burp Suite, yet this time it’s clicking “Users” tab in AAD:
GET ALL USERS:
POST /beta/$batch HTTP/1.1
Host: graph.microsoft.com
Content-Type: application/json
(...)

{"requests":[{"id":"List","method":"GET","url":"/users?$select=id,displayName,userPrincipalName,userType,onPremisesSyncEnabled,creationType,identities,mail,companyName,externalUserState,createdDateTime,jobTitle,department,accountEnabled,customSecurityAttributes&$top=20&$orderby=displayName asc&$count=true","headers":{"ConsistencyLevel":"eventual"}}]}
This gave a response with a list of ALL users in my Azure AD in a JSON format:
HTTP/1.1 200 OK
Content-Type: application/json
(...)
{
    "responses": [
        {
            "id": "List",
            "status": 200,
            "headers": {(...)},
            "body": {
                "@odata.context": "https://graph.microsoft.com/beta/$metadata#users(id,displayName,userPrincipalName,userType,onPremisesSyncEnabled,creationType,identities,mail,companyName,externalUserState,createdDateTime,jobTitle,department,accountEnabled,customSecurityAttributes)",
                "@odata.count": 5,
                "value": [
                    {
                        "id": "{UserGUID}",
                        "displayName": "Name Surname",
                        "userPrincipalName": "NameSurname@domain.com",
                        "userType": "Member",
                        "onPremisesSyncEnabled": null,
                        "creationType": null,
                        "mail": null,
                        "companyName": null,
                        "externalUserState": null,
                        "createdDateTime":
"2021-01-22T08:05:33Z",
                        "jobTitle": null,
                        "department": null,
                        "accountEnabled": true,
                        "customSecurityAttributes": null,
                        "identities": [
                            {}
                        ]
                    },
                    (Few more)
                ]
            }
        }
    ]
}
FINALLY! Some concrete stuff to work on!
Preparing custom function from webrequest
Armed with knowledge from previous steps I can now start preparing my own Powershell function that do just what I want it to. I usually utilise such template for Powershell webrequests:
$uri = ""

$body = @"
"@

$token = (Get-AzAccessToken -ResourceUrl "").token

$restObject = @{
    URI = $uri
    Method = 'POST'
    Headers = @{
        Authorization="Bearer $($token)"
        'Content-Type'="application/json"
    }
    Body = $body
}

$response = Invoke-WebRequest @restObject
When I combine this template with the knowledge I got from Burp Suite (and a little parsing through the output of the webrequest response) I get such a beautiful function:
function Get-AzureAdUsers {
    param (
        # Get All users from AAD
        [Parameter()]
        [switch]
        $All,
        # Get user from AAD by the displayName
        [Parameter()]
        [string]
        $UserDisplayName,
        # Bonus ;)
        [Parameter()]
        [switch]
        $Bonus
    )
    $uri = 'https://graph.microsoft.com/beta/$batch'

    $body = @"
{"requests":[{"id":"List","method":"GET","url":"/users?`$select=id,displayName,userPrincipalName,userType,onPremisesSyncEnabled,creationType,identities,mail,companyName,externalUserState,createdDateTime,jobTitle,department,accountEnabled,customSecurityAttributes&`$top=20&`$orderby=displayName asc&`$count=true","headers":{"ConsistencyLevel":"eventual"}}]}
"@
    $token = (Get-AzAccessToken -ResourceUrl "https://graph.microsoft.com").token
    $restObject = @{
        URI     = $uri
        Method  = 'POST'
        Headers = @{
            Authorization  = "Bearer $($token)"
            'Content-Type' = "application/json"
        }
        Body    = $body
    }
    $response = Invoke-WebRequest @restObject

    if ($All) {
        return ($response.Content | ConvertFrom-Json).responses.body.value
    }
    elseif ($UserDisplayName) {
        return ($response.Content | ConvertFrom-Json).responses.body.value | ? { $_.displayName -eq "$($UserDisplayName)" }
    }
    elseif ($bonus) {
        start-process "https://bit.ly/3JJN1wI"
    }
}
ALSO MIND TO BE LOGGED INTO AZURE!!!
Connect-AzAccount <- !!!
Example output of the function:
Get-AzureAdUsers -UserDisplayName "John Compiler"
id                       : {UserGUID}
displayName              : John Compiler
userPrincipalName        : JohnCompiler@mom.com
userType                 : Member
onPremisesSyncEnabled    :
creationType             :
mail                     :
companyName              : MinistryOfMagic
externalUserState        :
createdDateTime          : 22/02/2022 15:45:57
jobTitle                 : Insider Guy
department               : Department of Secrets
accountEnabled           : False
So now I can save it to a standalone script or use this function In the current session. But what if I have a plethora of such custom functions and I don’t want to reload each of them every time ????
Well… That’s a topic for another post ;) So stay tuned.
Closing thoughts
- Once I learned of the endpoint used, so “graph.microsoft.com” I could look up documentation for that endpoint in google, maybe a simpler method of fetching users is there, so work might’ve been shorter in general.
- Sometimes the fastest method for these functions is to simply Google the stuff You want to do with suffix “ via REST API”, the results will be methods of doing the stuff You want via web requests.
- This whole method of Burp Suite + Powershell is perfect exercise for learning some inner doings of Azure & the WEB in general. As You might record and later examine your traffic while doing your normal job.
- Also this technique can be used for more than Azure ;)